 Are you a photogenic dancer?
In the last few years, I have realized again and again an important fact about being a dancer: people take photos of you and how the photos turn out is almost as important as your performance itself.
Photo by Frank Kovalchek
Your live performance is important, of course. That is where you express your ideas and energy, and your audience react to your energy. I love that aspect of performance. It is communication of energy (and hence you get exhausted after a 5-minute performance). And whatever happens in the performance stays in the performance.
On the other hand, the photos other dancers or the audience took during the performance can go and live forever. Once they are on Facebook, hundreds of people can see them. If you’ve got a great pose in the photo, people will be impressed by your photo alone.
But posing is challenging! At the Twilight at the Oasis show hosted by the Middle Eastern Dance Association last October, this awesome photographer and beautiful dancer, Laura, was taking photos of performers backstage. Navid and I thought it was an excellent opportunity to get photos taken professionally. Then we realized we did not know how to pose AT ALL. It was really embarrassing. We tried different poses in the photo booth, thinking that many of those poses felt awkward, and we didn’t know where to look. Fortunately, Laura gave us suggestions and guidance, and her photos turned out great, considering her models were clumsy. But I thought as a dancer, I’d better start learning how to pose.
So I have been picking up tips here and there, and I want to share what I’ve found to be useful and can be applied right away 🙂
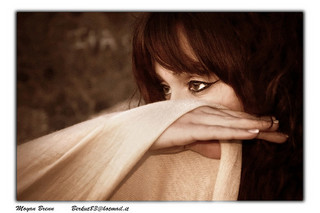 Tip #1: Place your hand(s) by your face
If you are taking a picture of your face only, bring up your hands around your face. If you look at CD covers or websites, a lot of professional belly dancers make poses with their hands. This can be used not only to bring out the poses unique to belly dance, but also to bring the focus to your face and brightens up the colour of your face.
Picture by Moyan Brenn on Flickr
Same goes with shoulders. Try looking back at the camera over your shoulder like this model in the CD cover. Bringing other parts of your body and skin close to your face brings more light on your face. Not sure how this works…but it works! (Share in the comment section if you know why this works.)

Tip #2: Squinch.
What is “squinch”? According to this video below, it is basically to squint a little, which brings out a relaxed, confident look. Have a look at the video, it’s pretty amazing how “good” the same person can look when they “squinch” their eyes as opposed to when their eyes are wide open.
To me, this is like “smiling with your eyes.”
Tip #3: Master the S Pose (or The Controposto Pose)
Photo by Alpha
I heard about this trick a long time ago, but I didn’t realize it had a name until I did this research. Gini Milicia in this article explains this pose very well:
The controposto is basically the following stance
-
Feet are adjacent to each other with weight on back foot and front foot pointing to camera
-
Hips are side on to camera
-
Upper body rotates to camera
For belly dancers, it would look great if you point down the toe of the front foot, which points to the camera.
Tip #4: Separate your limbs from your body
Arrghhh…Be very careful with those squished arms.

Tip #5: Elongate your neck
This one is particularly applicable to belly dancers. For most belly dance costumes, your neck is almost always showing, so when taking photography, try to elongate your neck. I have tried this doing the S pose in front of a mirror, and it makes a huge difference! It makes me look 2 inches taller!
By the way, this belly dancer, Sandra, has a website where she sells her used costumes. I look at her photos to get inspiration for new costume designs, because she has got an amazing collection, largely custom made by Bella. She is a great model as well, so her photos are great for getting pose ideas too! Check our Sandra’s costume gallery.

…Bonus Tips on Making Your Dance Photography Even Better
Here are extra tips that I found that make your pictures even better. These ones may require you to prepare things other than yourself or work with the photographer, so I am listing them as bonus tips.
Bonus Tip #1: Use props to feel relaxed
According to Improve Photography, props help models relax in photo shoots, which results in a more comfortable experience. So play with your props to get cool photos taken like this one!
Photo by Frank Kovalchek
Bonus Tip #2: Contrast the colour of your costume and background
Again, I learned this from Improve Photography. Their article says if you get to choose your background, and if you are wearing bright colours, choose a background with a muted colour. It helps you stand out more, and viewers focus more on you in the picture. It’s true, if these two dancers in the right picture were surrounded by colourful flowers, it would have been very destructing!
Bonus Tip #3: Use the wall
This one is related to the above point about background, and I love how walls can give a picture a very artistic look. Next time when you are in your costume and find a beautiful building or interesting wall, try learning against it, either with your back on it or your side.
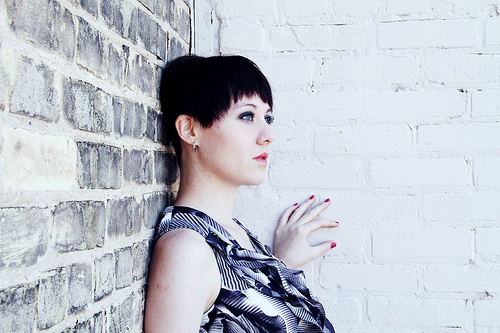
Photo by Kara Harms
So, now that we have studied a bit about posing, we should practice some in front of a mirror as part of dance practice. Yes, it feels a bit silly to be posing in front of a mirror, but you must find the best angle for your unique body shape! Take your right leg for example. When you make the S pose from tip #3, and your right leg shows from the slit in your skirt, at which angle does your leg create a nice, long line? We can only figure it out by looking at ourselves in the mirror.
Also, think about incorporating these poses in your choreography, especially your final pose. If you make poses for a couple of seconds in your piece, make sure your arms are not pressed against your body, in case someone takes a snapshot of you at that moment.
So, here is my question to you – what is your favourite pose? Share in the comment section below, and your comment will help others looking to find their pose!
Did you enjoy this article? Enter your email address below and receive our latest articles in your email inbox!
[mc4wp-form]
Good job putting this together, I would like to add a few points that may help others.
While general modelling principles such as the contrapposto, squinch, Tyra’s smeyes and the use of triangles to accent body shape can be applied to any photo shoot including those of dancers, it is important they are not used to the extent they turn the dancer into just a model. Modelling principles should only be used to enhance a dancers pose/position, a little tweak here, a little tweak there.
With regard to contrapposto, the only steadfast rule is weight on the back foot, this slims the thigh and hip closest to the camera. Foot, hip and upper body position should all be adjusted to provide the most flattering yet natural dance pose/position.
I can’t agree more about incorporating photo opportunities into ones choreography but would suggest what be included are position pauses rather than a modeling poses.
Thanks for your comment, Brendan! So valuable to have a photographer’s view here!
Totally agree about incorporating these principles to enhance our poses, especially in pauses. Being mindful of these principles will help us keep a nice posture as well 🙂
I really enjoy your passion and appreciation for dance as art, which is captured in your photos, Brendan. Thank you.